
Unified Transfer is in active development. As a pioneer merchant, you will be informed of the updates through your Maya Relationship Manager.
Overview
This guide walks you through the step-by-step process of integrating Unified Transfer to enable point-to-point (P2P) fund transfers across financial institutions in the Philippines.
By the end of this guide, you will be able to authenticate, initiate, confirm, and monitor fund transfers in the Sandbox and Production environments.
Prerequisites
Before starting integration, ensure the following requirements are completed:
- Understand the Authentication Model
- You should clearly understand How API Authentication Works in Unified Transfer
- The following components must already be implemented and accessible:
- Completed the Maya Onboarding for Unified Transfer, see Getting Started with Unified Transfer
- Obtain your OAuth 2.0 Client ID and Client Secret
- Register the following with Maya:
- Your JWKS endpoint URL
- Your Callback endpoint URL
- Ensure Sandbox credentials are active before testing
Integrating with Unified Transfer
Unified Transfer consists of four runtime stages:
- Authenticate
- Initiate Transfer
- Confirm Transfer
- Monitor Status
Every protected API call requires:
Authorization: Bearer {access_token}x-jws-signature: {detached_jws_signature}
Step 1: Authenticate (Obtain Access Token)
Before calling any Unified Transfer endpoint, obtain a Bearer token using the OAuth 2.0 Client Credentials Flow. Refer to Bearer Authentication
You can reuse the access token until it expires.
Step 2: Initiate Fund Transfer
Step 2.1: Build the Request Body
Create a transfer initiation object containing debit account, credit account, amount details, and optional KYC information.
Required Parameters:
debit_account- Source account information (financial_institution_code,account_number)credit_account- Destination account information (financial_institution_code,account_number,account_name)amount- Transfer amount and currency (PHPonly)
Optional Parameters:
ach_channel- ACH channel (instapay or pesonet, defaults to instapay for non-Maya institutions)sender- Sender KYC information (name,nationality,birth_date,present_address,income_source,identification)receiver- Receiver KYC informationtransaction_purpose- Purpose of the transactionorigin_country- Country where transaction originated
Example Request Object (Minimum):
{
  "data": {
    "initiation": {
      "debit_account": {
        "financial_institution_code": "PAPHPHM1XXX",
        "account_number": "041279562523"
      },
      "credit_account": {
        "financial_institution_code": "MBTCPHMMXXX",
        "account_number": "772356410242",
        "account_name": "Maria Reyes"
      },
      "amount": {
        "currency": "PHP",
        "value": 1000.00
      },
      "ach_channel": "instapay",
      "transaction_purpose": "Family Support/Allowance"
    }
  }
}
Example Request Object (With Full KYC):
{
  "data": {
    "initiation": {
      "debit_account": {
        "financial_institution_code": "PAPHPHM1XXX",
        "account_number": "041279562523"
      },
      "credit_account": {
        "financial_institution_code": "MBTCPHMMXXX",
        "account_number": "772356410242",
        "account_name": "Maria Reyes"
      },
      "amount": {
        "currency": "PHP",
        "value": 5000.00
      },
      "ach_channel": "pesonet",
      "transaction_purpose": "Business Capital",
      "sender": {
        "name": {
          "first_name": "Juan",
          "middle_name": "Dela",
          "last_name": "Cruz"
        },
        "contact_information": {
          "type": "msisdn",
          "value": "+639498187453"
        },
        "nationality": "PH",
        "gender": "M",
        "birth_date": "1985-01-01",
        "present_address": {
          "line1": "Blk 1 Lot 24 Maginhawa St.",
          "locality": "Bgry. Nagkaisang Nayon",
          "state": "Metro Manila",
          "zip_code": "1240",
          "city": "Quezon City",
          "country": "PH"
        },
        "income_source": "Business Proceeds",
        "identification": {
          "type": "Passport",
          "number": "110-230-987-000",
          "issue_country": "PH",
          "issue_date": "2020-01-01",
          "expiry_date": "2030-01-01"
        },
        "relationship_to_receiver": "Business Partner"
      }
    }
  }
}
Note: For accepted values (KYC types, income sources, transaction purposes, etc.), refer to Financial Institution Codes and Standard Field Values in Unified Transfer
Step 2.2: Sign the Request Body
Sign the exact JSON body using JWS (JSON Web Signature) with your private key to ensure request integrity and authenticity. See JWS Implementation Guide for Unified Transfer
Important Reminder:
- Sign the exact body sent to the API.
- Do not modify formatting after signing.
- Generate a new signature per request.
Step 2.3: Send the Initiate Request
Send the signed initiate request to the Initiate Transfer endpoint with the required headers.
POST /v1/transfers/p2p
Authorization: Bearer {access_token}
x-jws-signature: {jws_signature}
x-idempotency-key: {uuid}
x-originator-transaction-id: {unique_transaction_id}
x-fapi-interaction-id: {uuid}
Content-Type: application/json
Required Headers:
Authorization- Bearer token from OAuth 2.0 authentication (see Step 1)x-jws-signature- JWS signature of the request body (from Step 2.2)x-idempotency-key- UUID to prevent duplicate requestsx-originator-transaction-id- Your unique transaction identifier for trackingx-fapi-interaction-id- UUID for request tracing (optional but recommended)Content-Type- Must beapplication/json
Optional Headers:
x-auto-confirm- Set totrueto automatically confirm the transfer after initiation (defaults tofalse). When enabled, the API returns202 Acceptedwith no response body, and the separate Confirm Transfer step (Step 3) can be skipped. The final status will be delivered via callback. See Auto-Confirm Mode for details.
Success Response (201 Created):
A successful Initiate Transfer creates the transfer intent with the initial status INITIATED.
{
  "data": {
    "id": "c36d9958-9c55-49e3-b70e-702b082046c0",
    "status": "INITIATED",
    "created_timestamp": "2025-01-08 09:22:12.212",
    "confirmation_deadline": "2025-01-08 10:22:12.212",
    "initiation": {
      "debit_account": {
        "financial_institution_code": "PAPHPHM1XXX",
        "account_number": "041279562523"
      },
      "credit_account": {
        "financial_institution_code": "MBTCPHMMXXX",
        "account_number": "772356410242",
        "account_name": "Maria Reyes"
      },
      "amount": {
        "currency": "PHP",
        "value": 1000.00
      }
    },
    "transfer_details": {
      "gross_amount": {
        "currency": "PHP",
        "value": 1007.00
      },
      "principal_amount": {
        "currency": "PHP",
        "value": 1000.00
      },
      "fee": {
        "currency": "PHP",
        "value": 7.00
      }
    }
  }
}
Error Response (400 Bad Request):
{
  "errors": [
    {
      "code": "TRGINIT001",
      "description": "One or more fields have invalid values (headers or body). Please review the list of invalid fields provided in the response.",
      "parameters": [
        {
          "field": "credit_account.account_name",
          "desc": "Name must be up to 140 characters and must not contain invalid characters."
        }
      ]
    }
  ]
}
Step 3: Confirm Transfer
After successful initiation, confirm the transfer to begin processing.
If not confirmed within 1 hour, the status becomes
LAPSED.Tip: If you don't need a review step between initiation and confirmation, you can skip this step entirely by using the
x-auto-confirm: trueheader on the Initiate Transfer request. See Auto-Confirm Mode below.
Step 3.1: Sign the Empty Payload
Confirm Transfer has no request body, but you still need to sign the empty body with your private key to ensure request integrity and authenticity. For signing the request, refer to JWS Implementation Guide for Unified Transfer.
Step 3.2: Send the Confirmation Request
Send the signed confirmation request to the Confirm Transfer endpoint.
PUT /v1/transfers/p2p/{id}/confirmation
Authorization: Bearer {access_token}
x-jws-signature: {jws_signature}
x-fapi-interaction-id: {uuid}
Required Headers:
Authorization- Bearer token from OAuth 2.0 authentication (see Step 1)x-jws-signature- JWS signature of the request body (from Step 3.1)x-fapi-interaction-id- UUID for request tracing (optional but recommended)
Example Request:
PUT /v1/transfers/p2p/c36d9958-9c55-49e3-b70e-702b082046c0/confirmation
Authorization: Bearer eyJraWQiOiJyc2ExIiwiYWxnIjoiUlMyNTYifQ...
x-jws-signature: eyJhbGciOiJSUzI1NiIsImtpZCI6InlvdXIta2V5LWlkIn0...
Success Response (202 Accepted):
A successful confirmation, the status of the transfer intent will transition to PROCESSING status.
{
  "data": {
    "id": "c36d9958-9c55-49e3-b70e-702b082046c0",
    "status": "PROCESSING",
    "created_timestamp": "2025-01-08 09:22:12.212",
    "updated_timestamp": "2025-01-08 09:22:46.898",
    "confirmation_deadline": "2025-01-08 10:22:12.212",
    "initiation": { /* same as initiate response */ },
    "transfer_details": { /* same as initiate response */ }
  }
}
Error Response (404 Not Found):
{
  "errors": [
    {
      "code": "TRGCONF002",
      "description": "The fund transfer you are confirming does not exist. Please initiate a fund transfer first."
    }
  ]
}
Auto-Confirm Mode
If your integration does not require a review or approval step between initiation and confirmation, you can use the x-auto-confirm header to combine both steps into a single API call.
When x-auto-confirm: true is sent with the Initiate Transfer request:
- The API immediately returns
202 Acceptedwith no response body - Validation, initiation, and confirmation all happen asynchronously
- The final status (
APPROVEDorDECLINED) is delivered via callback
Example Request:
POST /v1/transfers/p2p
Authorization: Bearer {access_token}
x-jws-signature: {jws_signature}
x-idempotency-key: {uuid}
x-originator-transaction-id: {unique_transaction_id}
x-auto-confirm: true
Content-Type: application/json
Success Response: 202 Accepted (no response body)
Note: When using auto-confirm, you still receive the same callback notifications for the final status. You can also use the inquiry endpoints to check the transfer status at any time using the
x-originator-transaction-idyou provided.Important: When
x-auto-confirm: trueis used, the API always returns202 Acceptedwith no response body. All validation and processing happen asynchronously — if validation fails, the transfer will be delivered asDECLINEDvia callback.
Step 4: Monitor Transfer Status
You can track the transfer status using the transaction ID or originator transaction ID, or wait for the final status notification be delivered to your callback endpoint.
4.1. Polling to Status Inquiry Endpoints
Step 4.1.1: Sign the Empty Body
Status Inquiry has no request body, but you still need to sign the empty body with your private key to ensure request integrity and authenticity.
For signing the request, refer to JWS Implementation Guide for Unified Transfer.
Step 4.1.2: Send the Request to the API
Status Inquiry by ID:
GET /v1/transfers/p2p/{id}
Authorization: Bearer {access_token}
x-jws-signature: {jws_signature}
Status Inquiry by Originator Transaction ID:
GET /v1/transfers/p2p?x-originator-transaction-id={transaction_id}
Authorization: Bearer {access_token}
x-jws-signature: {jws_signature}
4.2. Receive Final Status via Callback
Unified Transfer notifies your system of the transaction status updates via your Callback endpoint. To get started with Callback, see Implementing Callback for Unified Transfer.
Key Integration Rules
- Always sign every protected request.
- Always send idempotency keys for initiation.
- Never reuse JWS signatures.
- Reuse access tokens until expiry.
- Confirm transfers within 1 hour.
Sample Complete Integration Flow (Python)
import requests
import jwt
import json
from datetime import datetime

class UnifiedTransferClient:
    def __init__(self, base_url, private_key_path, key_id):
        self.base_url = base_url
        self.private_key = open(private_key_path, 'r').read()
        self.key_id = key_id
        self.access_token = None

    def get_access_token(self, client_id, client_secret):
        """Get OAuth2 access token"""
        auth_url = f"{self.base_url}/token"
        response = requests.post(auth_url, data={
            'grant_type': 'client_credentials',
            'scope': 'transfer'
        }, auth=(client_id, client_secret))

        self.access_token = response.json()['access_token']
        return self.access_token

    def create_jws_signature(self, payload):
        """Create JWS signature for request body"""
        return jwt.encode(
            payload,
            self.private_key,
            algorithm='RS256',
            headers={'kid': self.key_id}
        )

    def initiate_transfer(self, transfer_data, idempotency_key, originator_txn_id, auto_confirm=False):
        """Initiate a P2P transfer"""
        url = f"{self.base_url}/v1/transfers/p2p"
        jws_signature = self.create_jws_signature(transfer_data)

        headers = {
            'Authorization': f'Bearer {self.access_token}',
            'x-jws-signature': jws_signature,
            'x-idempotency-key': idempotency_key,
            'x-originator-transaction-id': originator_txn_id,
            'Content-Type': 'application/json'
        }
    	if auto_confirm:
      	headers['x-auto-confirm'] = 'true'

        response = requests.post(url, json=transfer_data, headers=headers)

 			if auto_confirm and response.status_code == 202:
            return {'auto_confirmed': True}

        return response.json()

    def confirm_transfer(self, transfer_id):
        """Confirm a transfer for processing"""
        url = f"{self.base_url}/v1/transfers/p2p/{transfer_id}/confirmation"

        headers = {
            'Authorization': f'Bearer {self.access_token}',
            'x-jws-signature': self.create_jws_signature({}),
            'Content-Type': 'application/json'
        }

        response = requests.put(url, headers=headers)
        return response.json()

# Usage example
client = UnifiedTransferClient(
    base_url='https://sandbox.api.maya.ph',
    private_key_path='private_key.pem',
    key_id='your-key-id'
)

# Get access token
client.get_access_token('your_client_id', 'your_client_secret')

# Initiate transfer
transfer_data = {
    "data": {
        "initiation": {
            "debit_account": {
                "financial_institution_code": "PAPHPHM1XXX",
                "account_number": "041279562523"
            },
            "credit_account": {
                "financial_institution_code": "MBTCPHMMXXX",
                "account_number": "772356410242",
                "account_name": "Maria Reyes"
            },
            "amount": {
                "currency": "PHP",
                "value": 1000.00
            }
        }
    }
}

result = client.initiate_transfer(
    transfer_data,
    'a6b59599-a1e3-47cd-b9d7-ffaf56a2f1fe',
    'TXN20250108001'
)

if result['data']['status'] == 'INITIATED':
    # Confirm the transfer
    confirm_result = client.confirm_transfer(result['data']['id'])
    print(f"Transfer confirmed: {confirm_result['data']['status']}")

# Alternative: Using auto-confirm to skip the separate confirmation step
auto_result = client.initiate_transfer(
    transfer_data,
    'b7c60600-e9b2-579c-c8e8-gc82gg7d6bgf',
    'TXN20250108002',
    auto_confirm=True
)

if auto_result.get('auto_confirmed'):
    print("Transfer auto-confirmed. Waiting for callback for final status.")
Endpoints
By now, you should understand the essentials of integrating Unified Transfer, including:
- Which endpoints to call during the payment flow
- When to use each endpoint
Below is the summary of the core endpoints for Unified Transfer integration.
Partner-hosted Endpoints
| Name | Method | Description |
|---|---|---|
| JWKS Endpoint | A JSON Web Key Set (JWKS) endpoint that hosts your public signing keys, which Maya uses to verify the digital signatures on your API requests. | |
| Callback Endpoint | POST | Your callback endpoint, where you receive the transaction updates from Maya. It should be able to receive HTTP POST requests. |
Unified Transfer Endpoints
Every Unified Transfer endpoint requires both an OAuth 2.0 Bearer token and a JWS signature of the request body. See How API Authentication Works in Unified Transfer.
| Name | Method | Endpoint | Description |
|---|---|---|---|
| Initiate Transfer | POST | /v1/transfers/p2p | Use this API to initiate a secure fund transfer between accounts. All fields will be validated before processing. This API returns the id which you will use to confirm the processing of the fund transfer transaction. |
| Confirm Transfer | PUT | /v1/transfers/p2p/{id}/confirmation | Use this API to confirm the processing of an initiated fund transfer between accounts. The id returned in the Initiate Transfer will be needed in the Confirm Transfer API call. |
| Inquire Status using x-originator-transaction-id | GET | /v1/transfers/p2p | Retrieve detailed information about a previously initiated fund transfer using x-originator-transaction-id query parameter. |
| Inquire Status using ID | GET | /v1/transfers/p2p/{id} | Retrieve detailed information about a previously initiated fund transfer using its unique transaction ID. |
API Sequence
Initiate and Confirm Flow
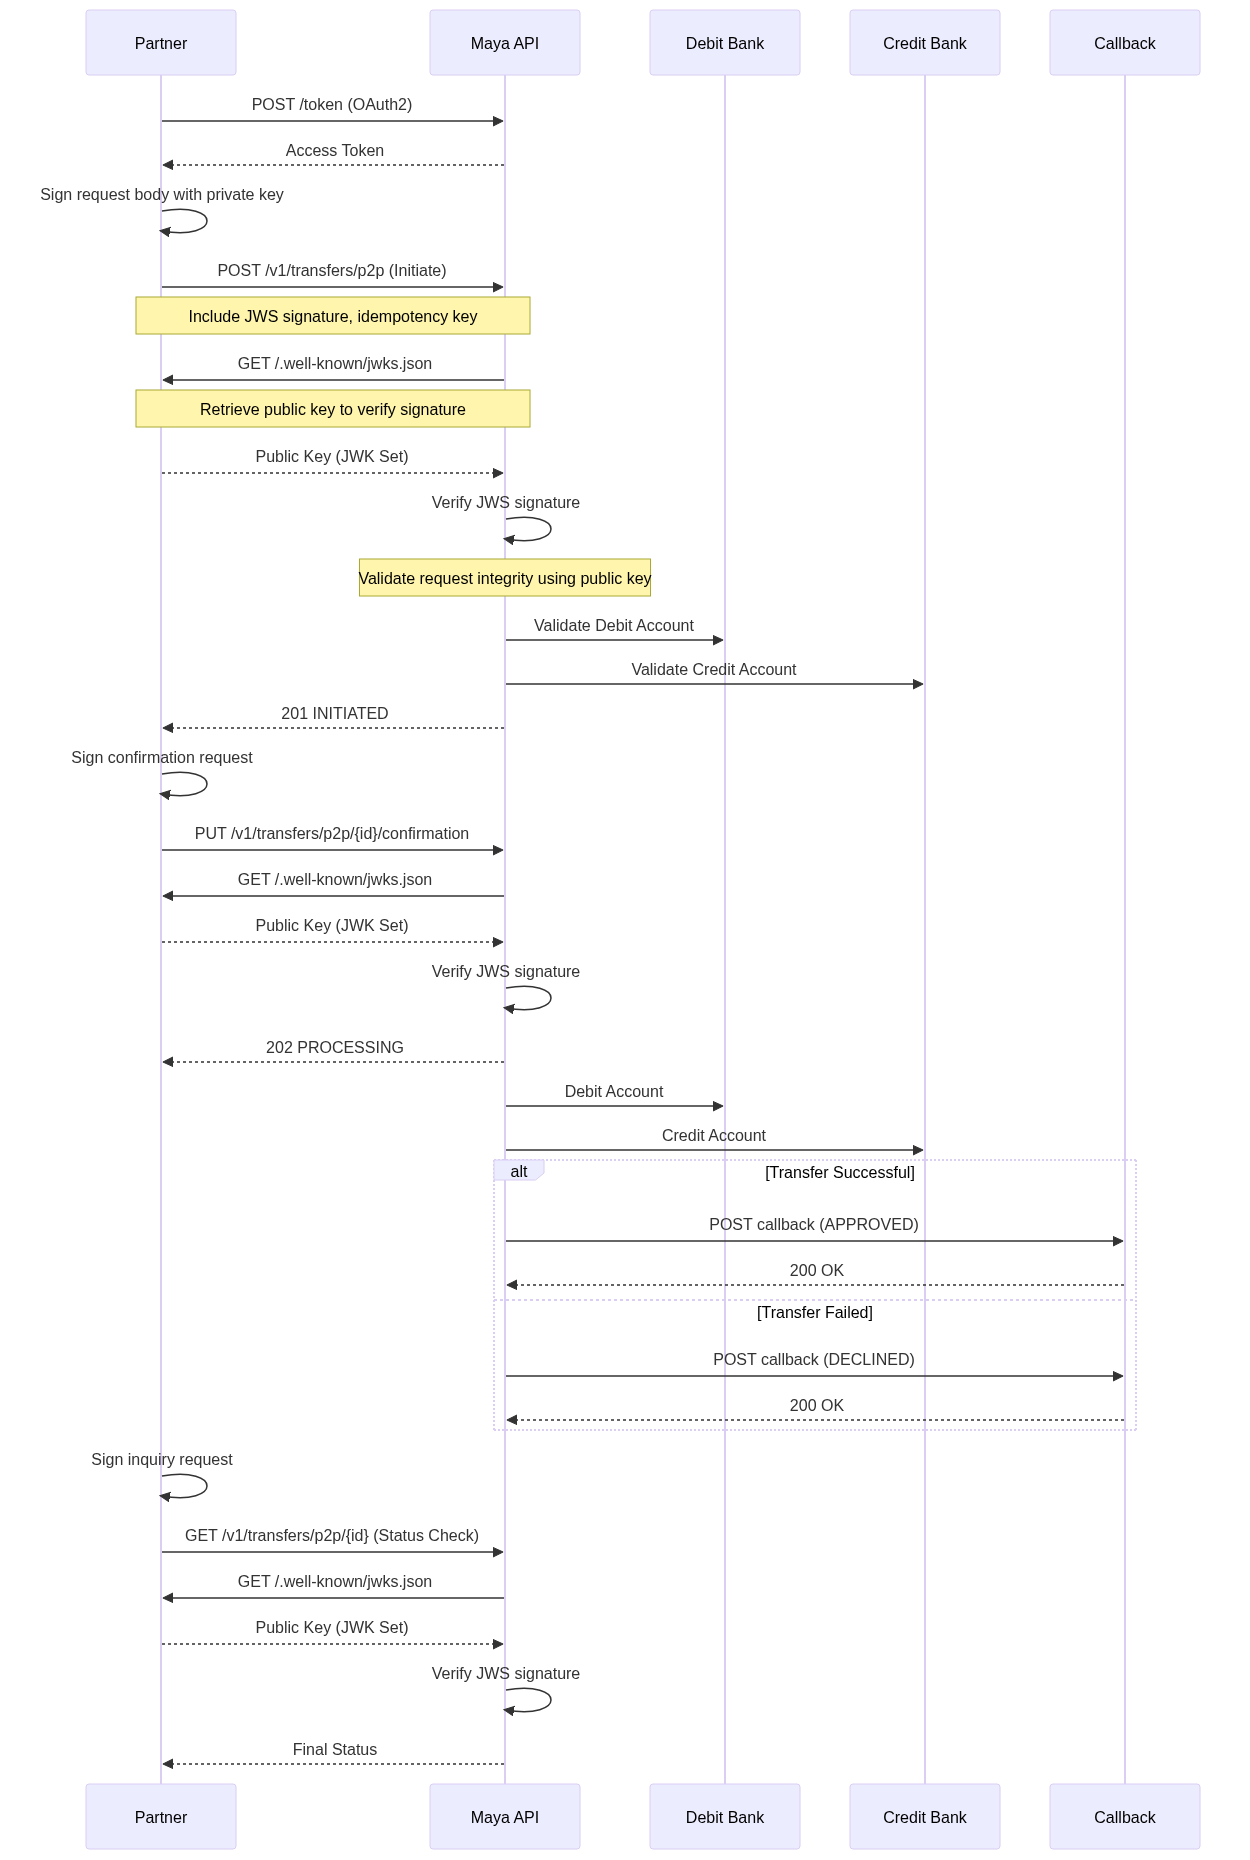
The sequence diagram above illustrates the standard P2P transfer flow, showing the two-step process (Initiate → Confirm) and asynchronous callback notifications for final status updates.
Auto-Confirm Flow

The sequence diagram above illustrates the auto-confirm flow, where a single Initiate Transfer call with x-auto-confirm: true handles both initiation and confirmation. The API returns 202 Accepted immediately, and the final status is delivered via callback.
Asynchronous Processing
Unified Transfer uses asynchronous processing for fund transfers:
Asynchronous Processing:
- Transfer initiation returns
INITIATEDstatus after validation - Transfer confirmation returns
PROCESSINGstatus - With auto-confirm, the API returns
202 Acceptedand processes everything asynchronously - Final status (
APPROVEDorDECLINED) is delivered via callback notifications - Callback notifications include retry mechanism with up to 5 callback attempts (with exponential backoff between attempts)
- Status polling available using inquiry endpoints for systems without callback capability
Transfer Status Flow:
INITIATED- Transfer validated and ready for confirmationPROCESSING- Transfer confirmed and being processed asynchronouslyAPPROVED- Transfer completed successfully (via callback)DECLINED- Transfer failed or rejected (via callback)LAPSED- Transfer not confirmed within 1-hour deadline
FAQs
Q: What is the maximum transfer amount?
A: Transfer limits depend on the processing method used:
- InstaPay: PHP 50,000.00 per transaction (real-time processing for external institutions)
- PESONet: PHP 300,000.00 per transaction (batch processing for external institutions)
- Maya: Account-specific limits (see Maya Account Limits for details)
Q: How long is a transfer valid for confirmation?
A: Initiated transfers must be confirmed within 1 hour, otherwise they will expire with status LAPSED.
Q: What ACH channels are supported?
A: The API supports InstaPay (real-time processing) and PESONet (batch processing) channels for external institutions. InstaPay is the default channel for transfers to non-Maya institutions and provides faster processing, while PESONet supports higher transaction amounts. Maya institutions use internal processing for potentially faster settlement.
Q: Can I cancel a transfer after confirmation?
A: No, transfers cannot be cancelled once confirmed and moved to PROCESSING status. Only INITIATED transfers can expire if not confirmed within the deadline.
Q: Can I skip the confirmation step?
A: Yes. Send the x-auto-confirm: true header with the Initiate Transfer request. The API will automatically confirm the transfer after successful initiation and return 202 Accepted with no response body. The final status is delivered via callback as usual.
Q: What information is required for a transfer?
A: Only three fields are mandatory: debit_account (source account), credit_account (destination account with account name), and amount. Additional fields like sender KYC information, transaction purpose, and ACH channel are optional.
Q: How do I get the final transfer status?
A: Final status (APPROVED or DECLINED) is delivered via callback notifications. You can also poll the status using the inquiry endpoints if callbacks are not available.
Q: What financial institution codes are supported?
A: Use SWIFT/BIC codes (11 characters) for financial institutions. The API supports transfers across over 100 Philippine financial institutions through InstaPay, PESONet, and Maya Group in-house processing. For the complete list of supported institutions and their codes, see Financial Institution Codes and Standard Field Values in Unified Transfer.
Next Steps
You have successfully implemented point-to-point (P2P) fund transfer using Unified Transfer. To build a more robust and production-ready integration, we recommend exploring the following: