
Overview
With the Maya Mini App, the customer's session is shared with your Mini App to enable seamless navigation from the Maya App to your Mini App.
API Sequence
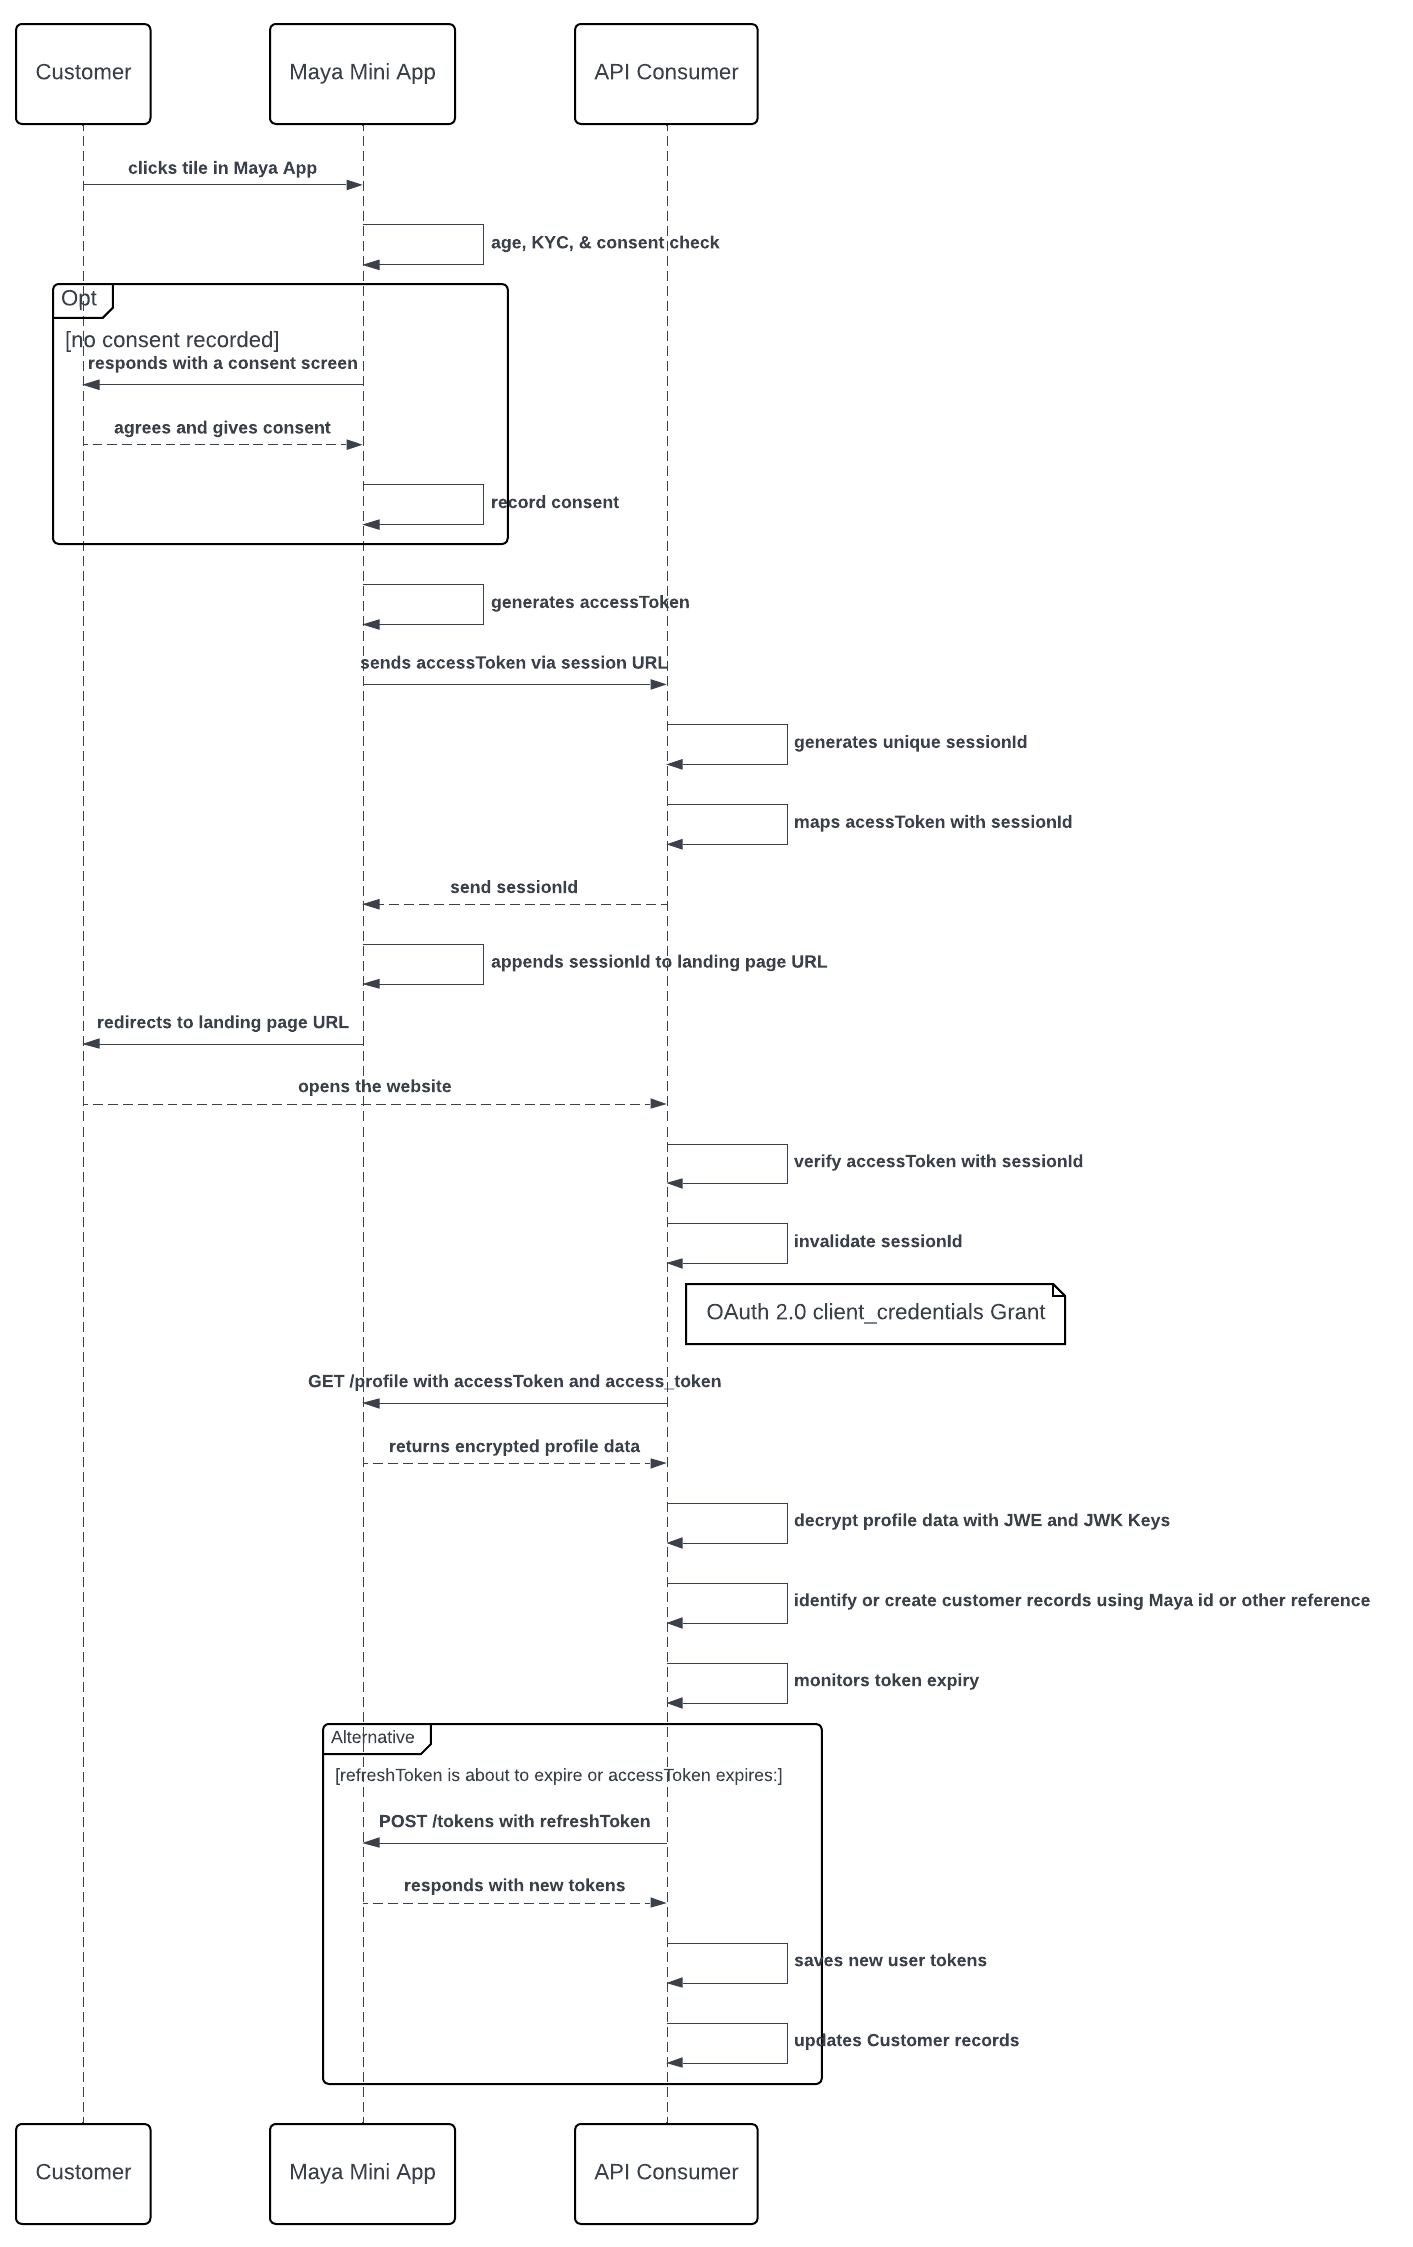
This flow covers both the normal token generation and session usage and the handling of an expired session.
- The customer clicks the tile within the Maya App triggering the Maya Mini App.
- The Maya Mini App performs an age and KYC (Know Your Customer) check.
- If no consent is recorded:
- Maya App will prompt the customer with the consent screen.
- The customer will then agree to the terms presented and give consent.
- Maya Mini App records the consent.
- Maya Mini App generates a Customer Access Token (
accessToken). - Maya Mini App sends the Customer Access Token (
accessToken) to the API Consumer through their session URL endpoint. - The API Consumer saves the Customer Access Token (
accessToken) and generates a uniquesessionIdto correspond with the Customer Access Token (accessToken). - API Consumer sends the
sessionIdas a response to the Maya Mini App. - The Maya Mini App appends the
sessionIdto the API Consumer's registered landing page URL. - Maya Mini App redirects the Customer to the API Consumer's landing page URL.
- The API Consumer uses the
sessionIdto verify the saved Customer Access Token (accessToken). - The API Consumer invalidates the
sessionId. - The API Consumer prepares the required tokens and credentials acquired from the Maya Mini App:
- Customer Access Token: the
accessTokenobtained from Maya through either your session URL or acquired by refreshing the tokens, whichever is the most recent or valid value - Bearer Token: the
access_tokenacquired during Bearer Authenticationusing the
client_credentialsgrant type
- Customer Access Token: the
- The API Consumer calls the Get Profile
endpoint of the Maya Mini App, providing the
accessTokenandaccess_token. - Maya Mini App processes the request and retrieves the profile data based on the client scope. Refer to the Supported Scopes
section for the list of scopes.
- After retrieving the profile data, the Maya Mini App sends the encrypted profile data to the API Consumer.
- The API Consumer monitors the Customer Access Token (
accessToken) and Customer Refresh Token (refreshToken) expiry. - When the Customer Refresh Token (
refreshToken) is about to expire:- The API Consumer uses the
refreshTokenand call the Refresh Token endpoint of the Maya Mini App. - Maya Mini App will generate a new Customer Access Token (
accessToken) and new Customer Refresh Token (refreshToken). - Maya Mini App returns the new Customer Access Token (
accessToken) and new Customer Refresh Token (refreshToken) to the API Consumer. - The API Consumer updates their system to save the new Customer Access Token (
accessToken) and new Customer Refresh Token (refreshToken).
- The API Consumer uses the
- When you need the
accessTokenbut it is already expired:- The API Consumer uses the valid or the most recent
refreshTokenand call the Refresh Token endpoint of the Maya Mini App. - Maya Mini App will generate a new Customer Access Token (
accessToken) and new Customer Refresh Token (refreshToken). - Maya Mini App returns the new Customer Access Token (
accessToken) and new Customer Refresh Token (refreshToken) to the API Consumer. - The API Consumer updates their system to save the new Customer Access Token (
accessToken) and new Customer Refresh Token (refreshToken).
- The API Consumer uses the valid or the most recent
Build your Integration
For the complete Sandbox Onboarding requirements, contact your designated Maya Relationship Manager.
Whitelist Maya IP Addresses
Implement IP whitelisting and whitelist Maya's IP Addresses in your Mini App.
To enhance security, you should implement IP whitelisting in your Mini App allowing access to Maya systems only. Implement an IP whitelisting mechanism and specify Maya’s IP Addresses.
Note that the Maya Mini App requests should come from the IPs listed below.
| Environment | IP addresses |
|---|---|
| Sandbox | 52.76.175.22813.251.40.23913.251.3.23718.138.3.140 |
| Production | 18.140.207.3652.220.51.1552.74.249.25352.74.249.18954.255.23.1052.220.109.32 |
Create your Session Initiation Endpoint
Create your dedicated endpoint to accept session details from the Maya Mini App.
You must create a dedicated endpoint, or the Session URL, where Maya can send the customer session securely and efficiently. Each time a customer accesses your application from the Maya app, Maya will send an API request to your Session URL endpoint.
With the customer's consent, Maya Mini App will send the following to your Session URL endpoint:
- Customer Access Token: the
accessTokenthat your mini app will need to perform actions on behalf of the customer - Customer Refresh Token: the
refreshTokenthat your mini app can use to generate a new customer access token
Sample payload your Session URL will receive:
curl --location 'https://your.site.com/mayaminiapp/accept' \
--header 'Request-Reference-No: bbd94290-1078-47c4-bc1a-a5a326afaaf5' \
--header 'Content-Type: application/json' \
--data '{
    "accessToken": "eyJ1aWQiOiI0MGE2YmI1NS1iYzBjLTQzMjktYTE0Yi0wMzlmY2I3ZmRkZjciLCJjbGllbnRfaWQiOiIwZjFmMjJhYy1lMjQzLT",
    "refreshToken": "eyJ1aWQiOiI0MGE2YmI1NS1iYzBjLTQzMjktYTE0Yi0wMzlmY2I3ZmRkZjciLCJjbGllbnRfaWQiOiIwZjFmMjJhYy1lMjQzLT",
    "expiresAt": 1659375851
}'
The Session URL endpoint must be capable of receiving and processing this request according to the provided API contract and shall respond with a sessionId to Maya. Be sure to follow the Session URL API Contract .
Sample Payload your Session URL is expected to respond:
{
    "sessionId": "Lr7I2MPDy_WUnnyCWyEE3737_PZF2VIKlQXbi-Q8kZw"
}
Once you have successfully set up your Session URL, kindly provide the URL endpoint to Maya. Reach out to your Maya Relationship Manager for detailed requirements and guidance throughout the onboarding procedure.
Create the Landing Page
Create your HTML 5 Mobile Web Application Landing Page.
Create a web application your customer can access within the Maya app. It should be mobile-responsive.
Maya will redirect the customer to your landing page, with the sessionId generated by your SessionURL endpoint. Implement the necessary logic and make sure that your landing page accepts and handles sessionId.
Development Considerations for the Landing Page
Maya will redirect the customer to your landing page, with the appended sessionId.
Landing Page URL (Sample): https://your-landing-page-url.com
Landing Page URL with appended sessionId: https://your-landing-page-url.com?sessionId={sessionId-value}
- Your landing page should be a GET endpoint capable of receiving the
sessionIdquery parameter - Invalidate the
sessionIdafter its initial use to prevent reuse; your system should reject any subsequent attempts with the samesessionId - Ensure the landing page URL is SSL-secured (https) and publicly accessible.
- Configure SSL on the standard port 443 to avoid potential network issues with Maya integration
Upon completing the setup of your Landing Page, kindly submit the URL of your Landing Page to Maya. For detailed requirements and guidance through the onboarding process, contact your Maya Relationship Manager.
Manage Mini App Session: New Customer Session
Complete the session initiation for the new customer session.
Your Mini App should be able to identify the customer via the sessionId. One way to do this is to have a mapping of Customer Access Token (accessToken) and sessionId.
Every sessionId your Mini App sends to Maya must be unique and can only be used once. Maya recommends invalidating the session ID once it has been utilized and ensuring that it will not be reused in the future.
In case of subsequent attempts, where the landing page employs the same sessionId, your system should decline or reject the access.
During session initiation, Maya will use the following endpoints you have developed and submitted during onboarding:
| Your URL/Endpoints | Data you'll Receive | Data you'll Return |
|---|---|---|
| Session URL | accessTokenrefreshTokenexpiresAt | sessionId |
| Landing Page | sessionId |
Be guided by the flow described in the API Sequence.
Monitoring Tokens: Your Mini App shall monitor the expiry of the customer tokens (accessToken and refreshToken), and keep these tokens valid or updated when the customer is active in your Mini App.
Maya recommends knowing your customer by leveraging the Profile Sharing feature of the Maya Mini App. To verify and enable this feature, contact your designated Maya Relationship Manager.
Manage Mini App Session: Expired Customer Session
Use the refreshToken to refresh the customer session in the Maya Mini App.
refreshToken to refresh the customer session in the Maya Mini App.At this point, your Mini App should have obtained and secured the following tokens:
- Customer Refresh Token: the
refreshTokenobtained from Maya through either your Session URL or acquired by refreshing the tokens, whichever is the most recent or valid value - Bearer Token: the
access_tokenacquired from Maya during Bearer Authenticationusing the
client_credentialsgrant type
Your Mini App is expected to call Refresh Token endpoint providing the required tokens when:
- The customer initiates a transaction but the Customer Access Token (
accessToken) is already expired - The customer is still active in your Mini App and the Customer Refresh Token (
refreshToken) is about to expire
Refer also to the Handling of Expired Maya Mini App Tokens for the scenarios and proper handling.
It's important to note that every successful token refresh will invalidate the old tokens, so you should also update your records with the new tokens.
Monitoring Tokens: Your Mini App shall monitor the expiry of the customer tokens (accessToken and refreshToken), and keep these tokens valid or updated when the customer is active in your Mini App.
What's Next?
Once you have implemented the session initiation and the proper handling of tokens, you may now explore and implement the following Maya Mini App features:
You can leverage these features depending on your scope and configuration in Maya. To verify and enable any of these features, contact your designated Maya Relationship Manager.
Endpoints
Partner-hosted Endpoints
These are the endpoints you need to prepare and submit to Maya during onboarding.
| Name | HTTP Method | Description |
|---|---|---|
| Session URL | POST | Your Session URL; should be capable of receiving the accessToken, refreshToken, expiryAt from Maya and returning a sessionId during session initiation |
| Landing Page | GET | Your Landing Page; should be capable of receiving a query parameter called sessionId |
Maya Mini App Endpoints
Endpoint/s you will need to manage the customer session in Maya Mini App.
| Name | HTTP Method | Key Type | Endpoint | Description |
|---|---|---|---|---|
| Refresh Token | POST | Bearer Auth | /tokens | Generate a new Customer Access Token (accessToken) and a new Customer Refresh Token (refreshToken) |
Business Rules to Code
To supplement your knowledge of the integration, it is essential to know the Business Rules to Code for Maya Mini Apps . This ensures that technology requirements and other development considerations are met.
At this point, you have understood the following:
- The necessary APIs and their endpoints
- The sequence and purpose of each API
- The prerequisites for building your integration
What to do when customer's accessToken expires?
Answer: Your platform must request to generate a new Customer Access Token (accessToken) from the Maya endpoints. See the Manage Mini App Session: Expired Customer Session for more details.
My transaction in Sandbox keeps failing. How can I fix this?
Answer: First, ensure your code is implemented correctly by reviewing the required steps. If your setup is correct but errors persist, check the Sandbox Health Page to verify if the service is operational. If the service is up, retrieve the error code and use the search box in the Maya Developer Hub to find relevant guides on resolving it.
Getting timeouts when connecting to the Sandbox of Maya. How can we resolve this?
Answer: If you're encountering timeouts in the Sandbox, first check the Sandbox Health Page to see if the service is operational. If the service is up but the issue persists, visit our Support Page
for the appropriate channel to escalate your concern.