
Building Confidence Through Isolation Testing: A Practical Guide
Created by: Elgin Peteza 7min read
Dec 19, 2025
DISCLAIMER: The concepts discussed in this blog are neither new nor original. This aims to provide readers a different view (or probably a similar one) on how an application/service can be tested based on actual experiences of the author while working in Maya.
For the purpose of this blog, let’s define Isolation Testing as a testing technique where a service is deployed and tested in a controlled environment, free from any external disruptions (such as users, other services, and shared dependencies).
Why are we conducting tests in isolation?
Why not directly deploy to the higher environment, such as staging? Why not immediately integrate with our clients and dependencies? Why spend time and effort setting up another environment when we can start testing on an existing one?
Let us look at the following scenarios.
Scenario #1:
A new feature is being developed. All unit tests passed, and the service has been updated in the higher environment. Then, end-to-end tests (E2Es) have been conducted, and then they start failing – so do requests from clients.
If we deploy and test in an isolated environment, we can minimize the impact of regression on our clients.
Scenario #2:
A new service needs to interact with an external cache to reduce the number of calls made to another service. The service should have the capability to disregard connection issues to with the cache service, since it can get the information directly from the source.
In a fully controlled environment, faults can be intentionally introduced to dependencies, such as downtime, without impacting other users.
Scenario #3:
A new service requires concurrent calls of the REST API of two other services. Upon receiving a valid response from one service, it should proceed without waiting for the other sevice.
We can use mocks to simulate responses that are challenging to replicate using real instances.
Scenario #4:
An end-to-end (E2E) process encounters a bug that resulted in an unhandled message within a service’s internal messaging system. The internal consumer goes into an infinite restart loop trying to process the faulty message.
If there are no connected clients, replication and cleanup of the issue become much easier.
The mentioned scenarios are not made up. These are some of the actual problems we have encountered, and similar ones may happen multiple times throughout a service’s lifetime.
Setting up the Environment
We use Docker Compose to set up the isolated environment. The process involves two primary steps: (1) containerizing the service or System-Under-Test (SUT) with Docker, and (2) creating docker-compose.yml file outlining the configuration of the SUT along with its dependencies (including helper scripts). We will focus on the latter.
Below is a sample docker-compose.yml file extracted from one of our services (some details omitted for simplicity):
services:
  ledger-services:
    image: ledger-services
    ports:
      - "9999:9999"

  zookeeper:
    image: confluentinc/cp-zookeeper
    environment:
      ZOOKEEPER_CLIENT_PORT: 2181

  kafka:
    image: confluentinc/cp-kafka
    ports:
      - "29092:29092"
    env_file:
      - ./config/kafka.env

  db:
    image: mysql
    ports:
      - "3306:3306"
    volumes:
      - ./config/db_init:/docker-entrypoint-initdb.d
The service, ledger-services, serves as our SUT. It uses a database to record transactions, Kafka for its internal and external publish-subscribe messaging system, and gRPC+Protobuf for its API. The system is built using sbt.
Common third-party dependencies (such as the MySQL database) usually have available images that can be pulled and used within the terms of their software licenses. These dependencies can often be configured through environment files/variables, while some accept mounted files for initialization.
Assuming proper configuration, the execution of docker compose up establishes an isolated environment.
While Docker Compose has its limitations, we have addressed them by incorporating helper scripts. For instance, we perform the startup of services in a coordinated manner to avoid unnecessary error logs within the SUT. Additionally, we have implemented handling for various image repositories such as Docker Hub for local execution, GitLab Dependency Proxy for Continuous Integration and Continuous Deployment (CI/CD). The image tag of the SUT is made configurable through environment variables. Furthermore, we chose to execute Liquibase updates from the host machine to initialize the database tables since it is already available in our toolchain.
Conducting Tests
The services can be exposed to the host machine using available ports. Given the setup for ledger-services, we can send gRPC requests on port 9999 of the localhost, and then validate the database entries on port 3306. With this, we can use any test driver from the host machine, such as Behave, Locust, or Scala Test Frameworks for automation, or Postman or grpcurl for manual testing.
The setup is not limited to pre-defined services. We can run another container and connect it to the setup’s network, which can then process existing test data. This is how we test triggered or scheduled services that perform post-processing of transactions.
For a slightly more complex example, let us look at the Statement of Account (SOA) service, which involves:
- Interacting with Kafka (consume and produce)
- Interacting with a database
- Receiving requests via REST API
- Getting info from other internal services via REST API
- Generating SOA file
- Uploading SOA file to AWS S3
- Sending email via SMTP
A combination of mock services such as WireMock, LocalStack, and smtp4dev, along with actual services like ledger-services, PostgreSQL, and Kafka, was employed during the testing of SOA. There is no hard rule dictating when to use each type of service. Typically, the decision is made based on the schedule vs. complexity.
The isolated environment for SOA can be visualized in the diagram below.
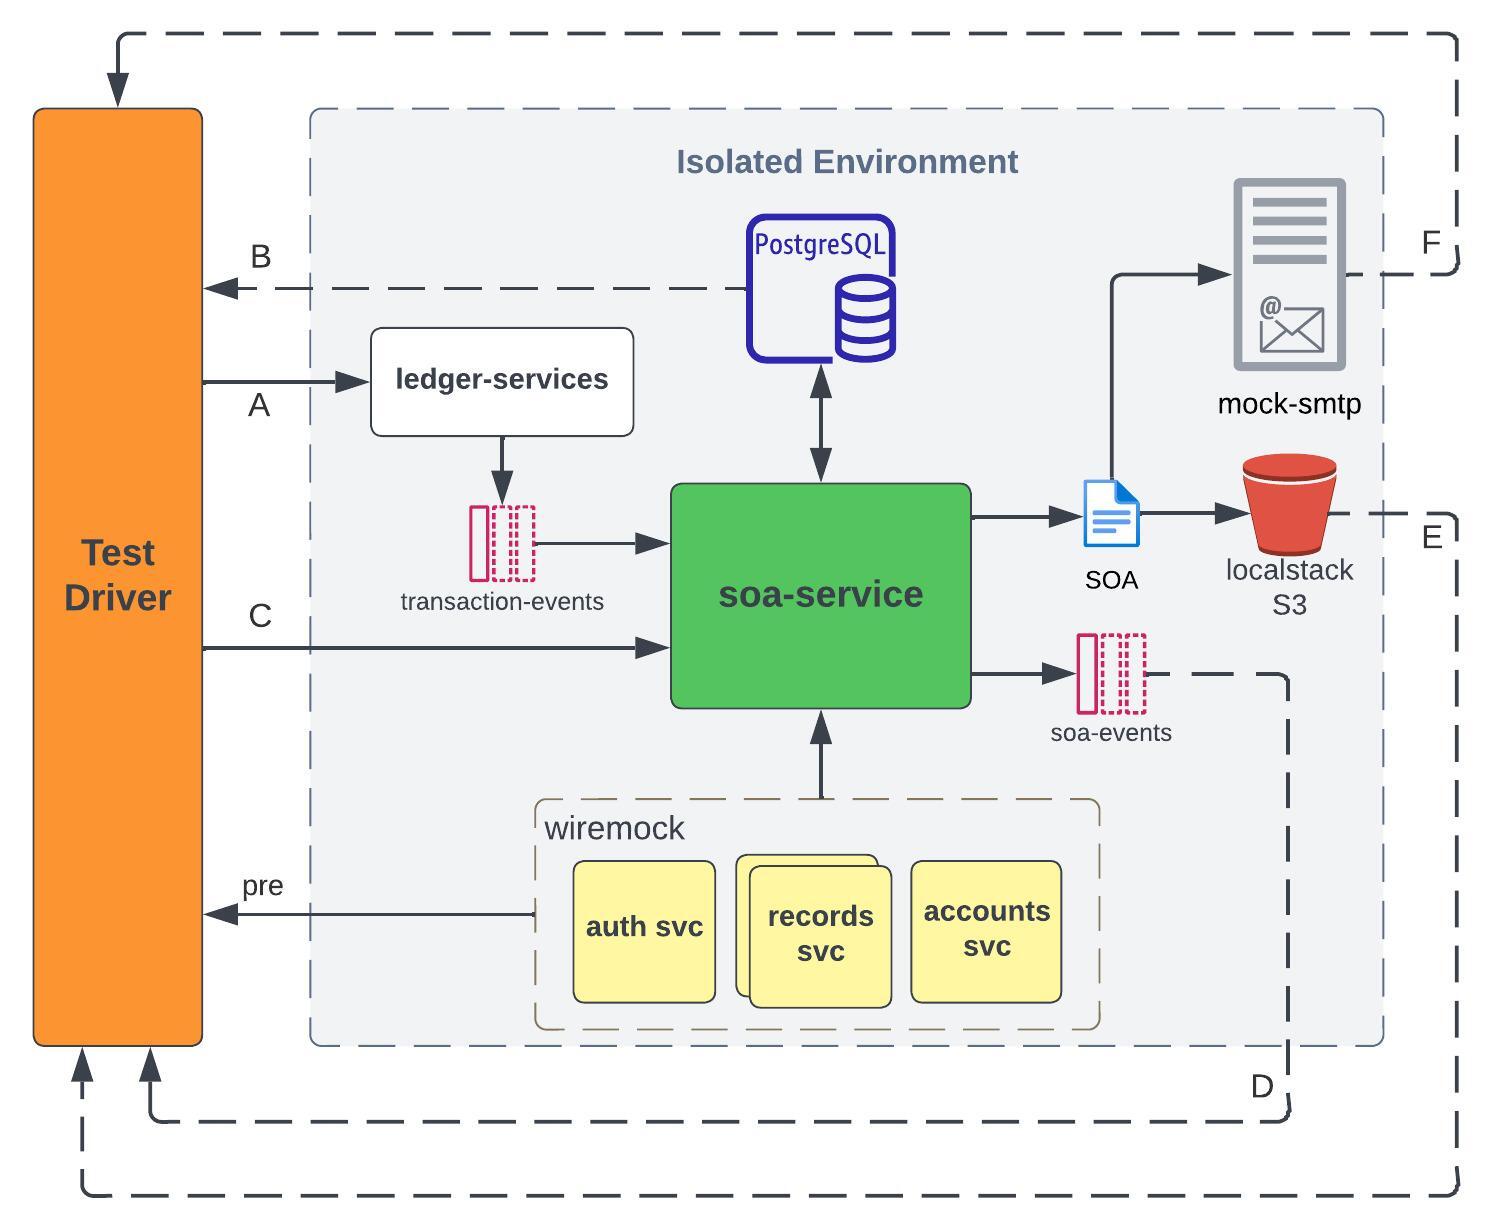
The solid arrows represent the flow of test data, while the broken ones represent validation points. The overall process is described in the steps below:
- The Test Driver sends transactions to
ledger-services(A), which are then received and ingested by the Kafka consumer ofsoa-servicethrough thetransaction-eventstopic. Those transactions are validated in PostgreSQL (B). - The Test Driver sends a SOA request to
soa-service(C), and the system pollssoa-eventstopic to get the status of the request (D). - For successful requests, the Test Driver downloads the SOA file from localstack S3 (E), and validates the contents based on the transactions from Step 1.
- The Test Driver checks the “sent” email using an IMAP client (F), validates the email’s content, and ensures that the attached SOA file is the same as the one in Step 3.
The mocks allow us to simulate scenarios that are difficult to perform in the higher environment.
- WireMock is a tool for mocking APIs. We used it in place of internal services to provide
soa-servicewith fake accounts, records, and security tokens. We also used it to simulate faults, such asConnection reset by peer, and delays in response. - smtp4dev is a dummy SMTP server. We used it to test email notifications without using a valid email address.
- LocalStack is a tool for testing cloud applications. It allowed us to test AWS S3 uploads and custom retry mechanisms offline.
Most test scenarios for SOA are designed to be executed during System Acceptance/Integration Testing (SAT) in the higher environment. During SAT, the Test Driver interacts with actual instances of the internal services, such as creating real account records, as part of its test setup. This is the reason why the Test Driver interacts with their corresponding mocks during isolation testing (pre).
The internal services could be implemented using a single WireMock container. However, we opted to separate them to facilitate conducting “chaos” tests using docker stop/pause on individual containers.
When we hit an unrecoverable issue, we just:
- Collect the container logs
- Dump the database tables
- Execute
docker compose down, and - Execute
docker compose up
We now have a clean test environment. We can then proceed with other scenarios while the investigation is ongoing.
Other Benefits
An isolated environment similar to the examples given is usually portable. The host machine just needs to be able to run Docker Compose and whatever tools are needed by the helper scripts. This is how we were able to easily migrate our E2Es from Jenkins to GitLab CI/CD.
The setup is extensible. In the first example (ledger-services), the SUT has evolved to multiple services that were added over the years. We were also able to easily attach OpenTelemetry collector to our SUT to test the exporting of telemetry data to Dynatrace.
The setup is modular - we can easily replace a dependency. For the SOA service, we can replace ledger-services to get transaction records from a different source.
Since we can dynamically set the image tag of the SUT using environment variables, we can test upgrades and downgrades in CI/CD using scripts.
Challenges we encountered
There are scenarios that could not be easily replicated in Docker Compose, such as Kubernetes rolling updates, so we also used minikube to simulate an isolated Kubernetes environment. We did not switch to minikube due to these reasons: (1) it demands a lot more resources, (2) it takes a lot more time to spin up, and (3) we encountered challenges integrating it into our CI/CD pipeline (related to root privileges).
We also encountered compatibility issues with ARM64, such as using Mac M1/M2. This should be considered when choosing an image for your dependencies. Additionally, we had to update how our services are built to support ARM64. In the CI/CD process, docker buildx is a good tool if an ARM64 runner is not available.
In one of our services, we encountered challenges in creating a fully isolated environment due to the complex setup of dependencies involving containerizing Oracle Database and GoldenGate. We ended up creating a semi-isolated environment wherein the input Kafka messages to the SUT are mirrored from the higher environment.
Due to the license changes in Docker for Mac, we had to find alternatives for local execution. Fortunately, we were able to use podman by installing additional compatibility tools and updating our helper scripts.
Takeaways
I hope to have given a glimpse of why and how we perform Isolation Testing. However, I would also like to emphasize that there is no one way to do it. You need to understand the different interactions that the SUT will go through. You have to weigh the tradeoffs between using mocks vs. real instances. More importantly, you need to align it with your planned test scenarios. While we recognize the time and effort needed to set up an isolated environment, we also recognize the long-term benefits that it provides.
Finally, we also have to accept that there are cases wherein complete isolation is just practically impossible, given the constraints of the feature/project, such as schedule or availability of resources. In such cases, we have to be creative and resourceful as engineers.
Again, the concepts discussed in this blog are not novel. I got the idea of Isolation Testing from other teams when I was just a new hire. Sometimes, we just have to look at how others are doing it.
Contributor

Learn more about Maya!
- Head back to our Maya Tech Blog for more interesting articles
- Keep up with the latest stories of innovation from Maya Stories
- or Check us out in LinkedIn.