
Maya's Cash-in can leverage Maya App’s code generation to allow Maya users to do a Cash-in through your platform.
This implementation will require customers to generate the Cash-In Code via their Maya app. It may be represented as a one-time 7-digit code or a bar code generated by the Maya app. This particular code will be crucial in identifying the target wallet account during the transfer transaction.
Discuss your preferred cash-in code with your Maya Relationship Manager.
API Sequence
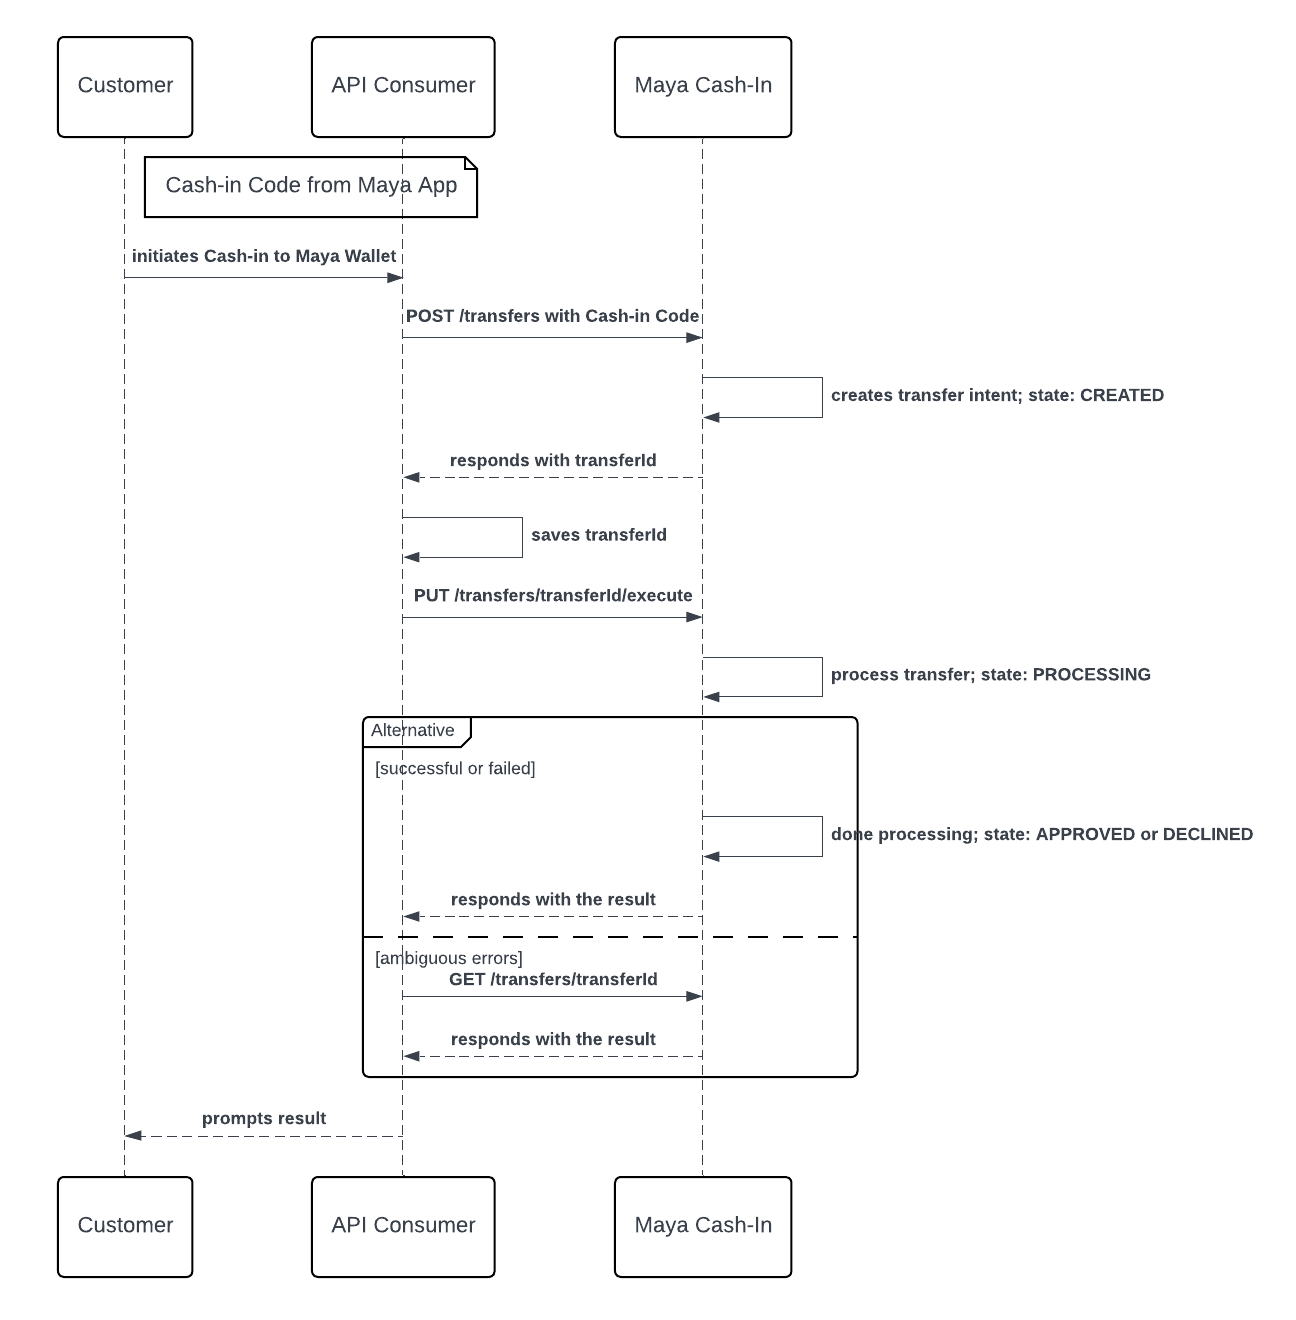
- The customer requests a Cash-in Code from their Maya App.
- Maya App generates and provides the Cash-in Code.
- The customer goes to the API Consumer’s nearest physical branch or platform providing the Cash-in Code.
- The API Consumer calls the Initiate a Transfer
endpoint of Maya Cash-in providing the Cash-in Code.
- Maya Cash-in creates a transfer intent in Maya, uniquely identified by a
transferId. - Maya Cash-in responds to the API Consumer with the generated
transferIdin Maya. - API Consumer saves the
transferId. - API Consumer calls Execute Transfer
endpoint of Maya Cash-in providing the
transferIdassociated with the transfer intent in Maya. - Maya Cash-in processes the transfer intent in Maya.
- If successful, Maya App reflects the transaction and Maya Cash-In responds to the API Consumer.
- If failed, Maya Cash-in notifies the API Consumer.
- If the API Consumer receives an ambiguous error
or no response from Maya Cash-in:
- API Consumer calls the Retrieve a Transfer
endpoint of Maya Cash-in providing the transferId in Maya.
- Maya Cash-in returns the details of the transfer intent associated with the
transferIdin Maya.
- API Consumer calls the Retrieve a Transfer
- The API Consumer notifies the customer of the status.
Build your Integration
This solution uses Basic Authentication, which requires API keys to authenticate incoming requests. To obtain your API key, please refer to the Acquire Keys from Relationship Manager guide.
Initiate and execute a Cash-in via Code
Use the Cash-in Code from Maya to initiate and execute a Cash-in to Maya wallet.
Once the customer has provided the Cash-in Code generated via their Maya app to your application, you may proceed with the following steps.
Step 1: Initiate Transfer
Initiate the Cash-in by calling the Initiate a Transfer endpoint of Maya. Each transfer attempt creates a new intent and is assigned a unique
transferId in Maya. Maya recommends generating a unique request reference number for each transfer.
Note that Maya's transferId will be used to ensure the idempotency of the transfer intent during execution.
At present, there is no time restriction for executing a transfer intent after it has been created. However, if you choose not to proceed, you can discard the transferId and handle the customer management on your end.
NOTE: Change in this behavior may be imposed in the future.
At this stage, no funds are moved within Maya. This provides you ample time to validate transfer details, including recipient information, potential fees, and other relevant factors.
Step 2: Execute Transfer
After creating the intent to transfer in Maya, proceed by calling the Execute Transfer endpoint of Maya with the provided
transferId. Triggering the Execute Transfer of Maya finalizes the request and authorizes the balance movement in Maya.
Execution of a particular transfer in Maya can only be done ONCE. Whether APPROVED or DECLINED, succeeding execution in Maya will return an error.
At this stage, funds are moved from your account in Maya to the customer’s Maya wallet.
Monitor the Cash-in transaction
Monitoring the Cash-in transaction in Maya.
As a Cash-in partner
Maya’s Cash-in endpoint processes requests synchronously, returning the final state in the response.
If a timeout or ambiguous error occurs, you can use the Retrieve a Transfer
endpoint of Maya with the
transferId to check the status.
As a Maya Wallet user
Customers will be notified via SMS from Maya or the Maya mobile app notification. They can view the Cash-in transaction in the Transaction List within the Maya App.
Endpoints
The following are the endpoints relevant for Cash-in via Code.
| Name | HTTP Method | Key Type | Endpoint | Description |
|---|---|---|---|---|
| Initiate Transfer | POST | SECRET | /transfers | Creates a transfer intent in Maya. Generates a transferId |
| Execute Transfer | PUT | SECRET | /transfers/{transferId}/execute | Processes a transfer intent on Maya associated with the transferId |
| Retrieve a Transfer | GET | SECRET | /transfers/{transferId} | Get the transfer intent in Maya associated with the transferId |
Business Rules to Code
To supplement your knowledge of the integration, it is essential to know the Business Rules to Code for Cash-in . This ensures that technology requirements and other development considerations are met.
At this point, you have understood the following:
- The necessary APIs and their endpoints
- The sequence and purpose of each API
- The prerequisites for building your integration
Do Maya support bar code for Cash-in?
Answer: Cash-in Code in Maya may be represented as a one-time 7-digit code or a bar code generated by the Maya app. Discuss your preferred cash-in code with your Maya Relationship Manager.
What is the expiry for Cash-in Code?
Answer: Cash-in Code in Maya is only valid for 30 minutes.
Is there an expiry on for transfer intent?
Answer: No expiry is implemented to the transfer intent in Maya. However, please note that a change in this behavior may be imposed in the future.
My transaction in Sandbox keeps failing. How can I fix this?
Answer: First, ensure your code is implemented correctly by reviewing the required steps. If your setup is correct but errors persist, check the Sandbox Health Page to verify if the service is operational. If the service is up, retrieve the error code and use the search box in the Maya Developer Hub to find relevant guides on resolving it.
Getting timeouts when connecting to the Sandbox of Maya. How can we resolve this?
Answer: If you're encountering timeouts in the Sandbox, first check the Sandbox Health Page to see if the service is operational. If the service is up but the issue persists, visit our Support Page
for the appropriate channel to escalate your concern.